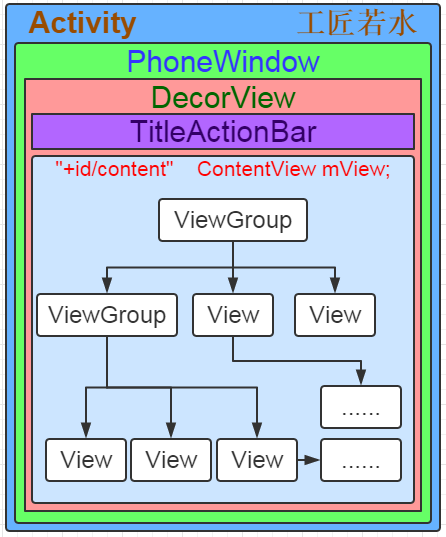
我们之前分析Window机制时已经清楚的理解了我们设置的View 就是DecorView的mContentParent下的View树
起点
WindowManagerGlobal
DecorView通过 WindowManager添加view到window显示与用户交互
而ViewRootImpl 是用来连接 WindowManager 和 DecorView 的桥梁
在 WindowManagerGlobal 的 addView(View view, ViewGroup.LayoutParams params, Display display, Window parentWindow) 方法中,创建了 ViewRootImpl 对象,将 ViewRootImpl 和 DecorView 相关联 root.setView(view, wparams, panelParentView);
Android中的任何一个布局、任何一个控件其实都是直接或间接继承自View实现的 这些View应该都具有相同的绘制流程与机制才能显示到屏幕上 每一个View的绘制过程都必须经历三个最主要的过程,也就是measure、layout和draw。
而整个view树的绘制就是通过ViewRootImpl将decorview绘制完成交由WindowManager在window上显示
ViewRootImpl
public void setView(View view, WindowManager.LayoutParams attrs, View panelParentView) {
       synchronized (this) {
           if (mView == null) {
			// 将 decorView 设置给全局的 mView
               mView = view;
			...
			// 标记已经添加了 decorView
			mAdded = true;
			...
			// 第一次发起布局,在添加到 WindowManager 之前
			// 确保在接收其他系统事件之前完成重新布局
			requestLayout();
			...
			// 利用 mWindowSession 以跨进程的方式向 WMS 发起一个调用,从而将DecorView 最终添加到 Window 上
		  	try {
		  	    mOrigWindowType = mWindowAttributes.type;
		  	    mAttachInfo.mRecomputeGlobalAttributes = true;
		  	    collectViewAttributes();
		  	    res = mWindowSession.addToDisplay(mWindow, mSeq, mWindowAttributes, getHostVisibility(), mDisplay.getDisplayId(),        mAttachInfo.mContentInsets, mAttachInfo.mStableInsets, mAttachInfo.mOutsets, mInputChannel);
               }
			...
		}
	}
}
这个源码方法的重点在与requestLayout(); 它是绘制步骤的关键我们继续深入
 @Override
    public void requestLayout() {
        if (!mHandlingLayoutInLayoutRequest) {
            checkThread();
            mLayoutRequested = true;
            scheduleTraversals();
        }
    }
最终调用scheduleTraversals();
 void scheduleTraversals() {
       if (!mTraversalScheduled) {
           mTraversalScheduled = true;
           mTraversalBarrier = mHandler.getLooper().getQueue().postSyncBarrier();
		// 发送消息,调用 mTraversalRunnable
           mChoreographer.postCallback(
                   Choreographer.CALLBACK_TRAVERSAL, mTraversalRunnable, null);
           if (!mUnbufferedInputDispatch) {
               scheduleConsumeBatchedInput();
           }
           notifyRendererOfFramePending();
           pokeDrawLockIfNeeded();
       }
   }

final TraversalRunnable mTraversalRunnable = new TraversalRunnable();

   final class TraversalRunnable implements Runnable {
       @Override
       public void run() {
		// 内部调用了 performTraversals()
           doTraversal();
       }
   }
在主线程调用doTraversal(); 最后在深入还是要看performTraversals()
private void performTraversals() {

	// 计算 Activity 中 window 的宽高等等
	...

	if (!mStopped || mReportNextDraw) {
               boolean focusChangedDueToTouchMode = ensureTouchModeLocally(
                       (relayoutResult&WindowManagerGlobal.RELAYOUT_RES_IN_TOUCH_MODE) != 0);
               if (focusChangedDueToTouchMode || mWidth != host.getMeasuredWidth()
                       || mHeight != host.getMeasuredHeight() || contentInsetsChanged ||
                       updatedConfiguration) {
                   // 得到 view 宽高的规格
                   // mWidth 和 mHeight 即用来描述 Activity 窗口宽度和高度
                   // lp.width 和 lp.height 就是 DecorView 的宽高
                   int childWidthMeasureSpec = getRootMeasureSpec(mWidth, lp.width);
                   int childHeightMeasureSpec = getRootMeasureSpec(mHeight, lp.height);

                   if (DEBUG_LAYOUT) Log.v(mTag, "Ooops, something changed!  mWidth="
                           + mWidth + " measuredWidth=" + host.getMeasuredWidth()
                           + " mHeight=" + mHeight
                           + " measuredHeight=" + host.getMeasuredHeight()
                           + " coveredInsetsChanged=" + contentInsetsChanged);

                    // Ask host how big it wants to be
                    // 开始执行测量工作,测量是从这里发起的
                   performMeasure(childWidthMeasureSpec, childHeightMeasureSpec);

                   // Implementation of weights from WindowManager.LayoutParams
                   // We just grow the dimensions as needed and re-measure if
                   // needs be
                   int width = host.getMeasuredWidth();
                   int height = host.getMeasuredHeight();
                   boolean measureAgain = false;

                   // 检查是否需要重新测量
                   if (lp.horizontalWeight > 0.0f) {
                       width += (int) ((mWidth - width) * lp.horizontalWeight);
                       childWidthMeasureSpec = MeasureSpec.makeMeasureSpec(width,
                               MeasureSpec.EXACTLY);
                       measureAgain = true;
                   }
                   if (lp.verticalWeight > 0.0f) {
                       height += (int) ((mHeight - height) * lp.verticalWeight);
                       childHeightMeasureSpec = MeasureSpec.makeMeasureSpec(height,
                               MeasureSpec.EXACTLY);
                       measureAgain = true;
                   }

                   // 需要再次测量的话,就再执行一遍 performMeasure
                   if (measureAgain) {
                       if (DEBUG_LAYOUT) Log.v(mTag,
                               "And hey let's measure once more: width=" + width
                               + " height=" + height);
                       performMeasure(childWidthMeasureSpec, childHeightMeasureSpec);
                   }

                   layoutRequested = true;
               }
           }

	...

       final boolean didLayout = layoutRequested && (!mStopped || mReportNextDraw);
       boolean triggerGlobalLayoutListener = didLayout
               || mAttachInfo.mRecomputeGlobalAttributes;
       if (didLayout) {
           // 执行布局工作,布局是从这里发起的
           performLayout(lp, mWidth, mHeight);

	...

	if (!cancelDraw && !newSurface) {
           if (mPendingTransitions != null && mPendingTransitions.size() > 0) {
               for (int i = 0; i < mPendingTransitions.size(); ++i) {
                   mPendingTransitions.get(i).startChangingAnimations();
               }
               mPendingTransitions.clear();
           }
           // 执行绘制工作,绘制是从这里发起的
           performDraw();
       }

	...

}
performTraversals() 方法的代码很长很长,但是我们关注点就可以放在三大流程上。其他的代码因为自己能力欠缺,并不能一一说出这些代码的作用。所以我们接下来就把重点放在:
1.getRootMeasureSpec
2.performMeasure
3.performLayout
4.performDraw
getRootMeasureSpec
windowSizeMayChange |= measureHierarchy(host, lp, res,
        desiredWindowWidth, desiredWindowHeight);
在 measureHierarchy 方法中已经调用了 performMeasure 来进行测量 这里只是为了确定 window 的大小而做的测量辅助
在 measureHierarchy 中,确定了 DecorView 的 MeasureSpec 。其中 childWidthMeasureSpec 和 childHeightMeasureSpec 即为 DecorView 对应的 MeasureSpec 。
private static int getRootMeasureSpec(int windowSize, int rootDimension) {
    int measureSpec;
    switch (rootDimension) {

    case ViewGroup.LayoutParams.MATCH_PARENT:
        // Window can't resize. Force root view to be windowSize.
        measureSpec = MeasureSpec.makeMeasureSpec(windowSize, MeasureSpec.EXACTLY);
        break;
    case ViewGroup.LayoutParams.WRAP_CONTENT:
        // Window can resize. Set max size for root view.
        measureSpec = MeasureSpec.makeMeasureSpec(windowSize, MeasureSpec.AT_MOST);
        break;
    default:
        // Window wants to be an exact size. Force root view to be that size.
        measureSpec = MeasureSpec.makeMeasureSpec(rootDimension, MeasureSpec.EXACTLY);
        break;
    }
    return measureSpec;
}
如果是 MATCH_PARENT ,那么对应的就是窗口大小;
如果是 WRAP_CONTENT ,那么不能超过窗口大小;
固定大小,那么就是大小就是传入的 lp.width/lp.height 了。
ViewGroup中 计算子 View 测量规格的 getChildMeasureSpec 方法
也是根据父容器的规格确定子容器
具体可用这张图表示

总结:对于 DecorView 来说,其 MeasureSpec 是由窗口的大小和自身的 LayoutParams 来共同决定的;而对于普通的 View 来说,其 MeasureSpec 是由父容器的 MeasureSpec 和自身的 LayoutParams 共同决定的。
performMeasure
private void performMeasure(int childWidthMeasureSpec, int childHeightMeasureSpec) {
    Trace.traceBegin(Trace.TRACE_TAG_VIEW, "measure");
    try {
        // 进行测量
        mView.measure(childWidthMeasureSpec, childHeightMeasureSpec);
    } finally {
        Trace.traceEnd(Trace.TRACE_TAG_VIEW);
    }
}
在 performMeasure 中调用了 measure 方法。说到底,DecorView 只是一个View所以我们又要进入 View 类中去看下。
View 的 measure 方法内部是调用了 onMeasure
这里小提一下,我们都知道 DecorView 其实是一个 FrameLayout ,所以 onMeasure 应该在 FrameLayout 中去看
@Override
protected void onMeasure(int widthMeasureSpec, int heightMeasureSpec) {
    int count = getChildCount();
    // 判断当前 framelayout 布局的宽高是否至少一个是 match_parent 或者精确值 ,如果是则置 measureMatchParent 为 false .
    final boolean measureMatchParentChildren =
            MeasureSpec.getMode(widthMeasureSpec) != MeasureSpec.EXACTLY ||
            MeasureSpec.getMode(heightMeasureSpec) != MeasureSpec.EXACTLY;
    mMatchParentChildren.clear();

    int maxHeight = 0;
    int maxWidth = 0;
    int childState = 0;

    // 遍历不为 GONE 的子 view
    for (int i = 0; i < count; i++) {
        final View child = getChildAt(i);
        if (mMeasureAllChildren || child.getVisibility() != GONE) {
            // 对每一个子 View 进行测量
            measureChildWithMargins(child, widthMeasureSpec, 0, heightMeasureSpec, 0);
            final LayoutParams lp = (LayoutParams) child.getLayoutParams();
            // 寻找子 View 中宽高的最大者,因为如果 FrameLayout 是 wrap_content 属性
            // 那么它的宽高取决于子 View 中的宽高最大者
            maxWidth = Math.max(maxWidth,
                    child.getMeasuredWidth() + lp.leftMargin + lp.rightMargin);
            maxHeight = Math.max(maxHeight,
                    child.getMeasuredHeight() + lp.topMargin + lp.bottomMargin);
            childState = combineMeasuredStates(childState, child.getMeasuredState());
            // 如果 FrameLayout 为 wrap_content 且 子 view 的宽或高为 match_parent ,那么就添加到 mMatchParentChildren 中
            if (measureMatchParentChildren) {
                if (lp.width == LayoutParams.MATCH_PARENT ||
                        lp.height == LayoutParams.MATCH_PARENT) {
                    mMatchParentChildren.add(child);
                }
            }
        }
    }

    // Account for padding too
    maxWidth += getPaddingLeftWithForeground() + getPaddingRightWithForeground();
    maxHeight += getPaddingTopWithForeground() + getPaddingBottomWithForeground();

    // Check against our minimum height and width
    maxHeight = Math.max(maxHeight, getSuggestedMinimumHeight());
    maxWidth = Math.max(maxWidth, getSuggestedMinimumWidth());

    // Check against our foreground's minimum height and width
    final Drawable drawable = getForeground();
    if (drawable != null) {
        maxHeight = Math.max(maxHeight, drawable.getMinimumHeight());
        maxWidth = Math.max(maxWidth, drawable.getMinimumWidth());
    }
    //设置测量结果
    setMeasuredDimension(resolveSizeAndState(maxWidth, widthMeasureSpec, childState),
            resolveSizeAndState(maxHeight, heightMeasureSpec,
                    childState << MEASURED_HEIGHT_STATE_SHIFT));

    // 子View中设置为match_parent的个数
    count = mMatchParentChildren.size();
    // 若 FrameLayout 为 wrap_content 且 count > 1
    if (count > 1) {
        for (int i = 0; i < count; i++) {
            final View child = mMatchParentChildren.get(i);
            final MarginLayoutParams lp = (MarginLayoutParams) child.getLayoutParams();

            // 如果子 View 的宽度是 match_parent 属性,那么对 childWidthMeasureSpec 修改:
            // 把 widthMeasureSpec 的宽度修改为:framelayout总宽度 - padding - margin,模式设置为 EXACTLY
            final int childWidthMeasureSpec;
            if (lp.width == LayoutParams.MATCH_PARENT) {
                final int width = Math.max(0, getMeasuredWidth()
                        - getPaddingLeftWithForeground() - getPaddingRightWithForeground()
                        - lp.leftMargin - lp.rightMargin);
                childWidthMeasureSpec = MeasureSpec.makeMeasureSpec(
                        width, MeasureSpec.EXACTLY);
            } else {
                // 否则就按照正常的来就行了
                childWidthMeasureSpec = getChildMeasureSpec(widthMeasureSpec,
                        getPaddingLeftWithForeground() + getPaddingRightWithForeground() +
                        lp.leftMargin + lp.rightMargin,
                        lp.width);
            }

            // 高度同理
            final int childHeightMeasureSpec;
            if (lp.height == LayoutParams.MATCH_PARENT) {
                final int height = Math.max(0, getMeasuredHeight()
                        - getPaddingTopWithForeground() - getPaddingBottomWithForeground()
                        - lp.topMargin - lp.bottomMargin);
                childHeightMeasureSpec = MeasureSpec.makeMeasureSpec(
                        height, MeasureSpec.EXACTLY);
            } else {
                childHeightMeasureSpec = getChildMeasureSpec(heightMeasureSpec,
                        getPaddingTopWithForeground() + getPaddingBottomWithForeground() +
                        lp.topMargin + lp.bottomMargin,
                        lp.height);
            }
            //对于这部分的子 View 需要重新进行 measure 过程
            child.measure(childWidthMeasureSpec, childHeightMeasureSpec);
        }
    }
}
其实总的来说重要的就只有遍历 child.measure(childWidthMeasureSpec, childHeightMeasureSpec) 这个方法,这是将父容器的 measure 过程传递到子 View 中。
而子 View 被父容器调用了 measure 后,也会调用属于自己的 onMeasure 方法
protected void onMeasure(int widthMeasureSpec, int heightMeasureSpec) {
    setMeasuredDimension(getDefaultSize(getSuggestedMinimumWidth(), widthMeasureSpec),
            getDefaultSize(getSuggestedMinimumHeight(), heightMeasureSpec));
}
在onMeasure源码中设置宽高尺寸 使用了getDefaultSize,我们在看下getDefaultSize的源码
public static int getDefaultSize(int size, int measureSpec) {
        int result = size;
        //通过MeasureSpec解析获取mode与size 即前两位和后三十位
        int specMode = MeasureSpec.getMode(measureSpec);
        int specSize = MeasureSpec.getSize(measureSpec);

        switch (specMode) {
//父控件对子控件不加任何束缚,子元素可以得到任意想要的大小
        case MeasureSpec.UNSPECIFIED:
            result = size;
            break;
        case MeasureSpec.AT_MOST://父控件为子View指定确切大小
        case MeasureSpec.EXACTLY://父控件为子元素指定最大参考尺寸
            result = specSize;
            break;
        }
        return result;
    }
若是 UNSPECIFIED ,则直接返回的就是 getSuggestedMinimumWidth/getSuggestedMinimumHeight 的值;
若是 AT_MOST/EXACTLY ,直接用的就是 specSize 。
而根据我们之前总结出来的表可知,只要 view 不指定固定大小,那么无论是 AT_MOST 还是 EXACTLY ,都是按照 parentSize 来的。
performLayout
host.layout(0, 0, host.getMeasuredWidth(), host.getMeasuredHeight());
基本可知,performLayout 是通过调用 DecorView 的 layout 方法来向下传递布局的。所以我们应该继续追踪 FrameLayout 的 layout 方法,其实就是 ViewGroup 的 layout 方法。
@Override
public final void layout(int l, int t, int r, int b) {
    if (!mSuppressLayout && (mTransition == null || !mTransition.isChangingLayout())) {
        if (mTransition != null) {
            mTransition.layoutChange(this);
        }
        // 调用 view 的 layout 方法
        super.layout(l, t, r, b);
    } else {
        // record the fact that we noop'd it; request layout when transition finishes
        mLayoutCalledWhileSuppressed = true;
    }
}
在 ViewGroup 的 layout 方法中又调用了父类的方法 super.layout(l, t, r, b) 。所以我们又要到 View 类中去看。
@SuppressWarnings({"unchecked"})
public void layout(int l, int t, int r, int b) {
    if ((mPrivateFlags3 & PFLAG3_MEASURE_NEEDED_BEFORE_LAYOUT) != 0) {
        onMeasure(mOldWidthMeasureSpec, mOldHeightMeasureSpec);
        mPrivateFlags3 &= ~PFLAG3_MEASURE_NEEDED_BEFORE_LAYOUT;
    }

    // 当前布局的四个顶点
    int oldL = mLeft;
    int oldT = mTop;
    int oldB = mBottom;
    int oldR = mRight;

    // 计算四个顶点的值,判断布局位置是否改变
    boolean changed = isLayoutModeOptical(mParent) ?
            setOpticalFrame(l, t, r, b) : setFrame(l, t, r, b);//setOpticalFrame 的内部也是调用 setFrame 方法的。

    // 如果视图的大小和位置发生变化,会调用onLayout()
    if (changed || (mPrivateFlags & PFLAG_LAYOUT_REQUIRED) == PFLAG_LAYOUT_REQUIRED) {

        // 空方法
        onLayout(changed, l, t, r, b);

        if (shouldDrawRoundScrollbar()) {
            if(mRoundScrollbarRenderer == null) {
                mRoundScrollbarRenderer = new RoundScrollbarRenderer(this);
            }
        } else {
            mRoundScrollbarRenderer = null;
        }

        mPrivateFlags &= ~PFLAG_LAYOUT_REQUIRED;

        // 调用布局位置改变监听器
        ListenerInfo li = mListenerInfo;
        if (li != null && li.mOnLayoutChangeListeners != null) {
            ArrayList<OnLayoutChangeListener> listenersCopy =
                    (ArrayList<OnLayoutChangeListener>)li.mOnLayoutChangeListeners.clone();
            int numListeners = listenersCopy.size();
            for (int i = 0; i < numListeners; ++i) {
                listenersCopy.get(i).onLayoutChange(this, l, t, r, b, oldL, oldT, oldR, oldB);
            }
        }
    }

    mPrivateFlags &= ~PFLAG_FORCE_LAYOUT;
    mPrivateFlags3 |= PFLAG3_IS_LAID_OUT;
}
1.设置当前布局中的四个顶点;2.调用 setFrame 来设置新的顶点位置;3.调用 onLayout 方法;4.回调布局位置改变监听器;
在setFrame(l, t, r, b)判断大小是否改变 改变了就重绘 并回调相关接口
之后回调onLayout方法 因为decorview为framelayout进入其onLayout方法
@Override
   protected void onLayout(boolean changed, int left, int top, int right, int bottom) {
       layoutChildren(left, top, right, bottom, false /* no force left gravity */);
   }


   void layoutChildren(int left, int top, int right, int bottom, boolean forceLeftGravity) {
       final int count = getChildCount();

       final int parentLeft = getPaddingLeftWithForeground();
       final int parentRight = right - left - getPaddingRightWithForeground();

       final int parentTop = getPaddingTopWithForeground();
       final int parentBottom = bottom - top - getPaddingBottomWithForeground();

       // 遍历子 view
       for (int i = 0; i < count; i++) {
           final View child = getChildAt(i);
           if (child.getVisibility() != GONE) {
               final LayoutParams lp = (LayoutParams) child.getLayoutParams();

               // 子 view 的宽高
               final int width = child.getMeasuredWidth();
               final int height = child.getMeasuredHeight();

               int childLeft;
               int childTop;

               // 得到子 view 的 gravity
               int gravity = lp.gravity;
               if (gravity == -1) {
                   gravity = DEFAULT_CHILD_GRAVITY;
               }

               final int layoutDirection = getLayoutDirection();
               final int absoluteGravity = Gravity.getAbsoluteGravity(gravity, layoutDirection);
               final int verticalGravity = gravity & Gravity.VERTICAL_GRAVITY_MASK;

               // 根据不同的 gravity 来计算 childLeft
               switch (absoluteGravity & Gravity.HORIZONTAL_GRAVITY_MASK) {
                   case Gravity.CENTER_HORIZONTAL:
                       childLeft = parentLeft + (parentRight - parentLeft - width) / 2 +
                       lp.leftMargin - lp.rightMargin;
                       break;
                   case Gravity.RIGHT:
                       if (!forceLeftGravity) {
                           childLeft = parentRight - width - lp.rightMargin;
                           break;
                       }
                   case Gravity.LEFT:
                   default:
                       childLeft = parentLeft + lp.leftMargin;
               }


               // 根据不同的 gravity 来计算 childTop
               switch (verticalGravity) {
                   case Gravity.TOP:
                       childTop = parentTop + lp.topMargin;
                       break;
                   case Gravity.CENTER_VERTICAL:
                       childTop = parentTop + (parentBottom - parentTop - height) / 2 +
                       lp.topMargin - lp.bottomMargin;
                       break;
                   case Gravity.BOTTOM:
                       childTop = parentBottom - height - lp.bottomMargin;
                       break;
                   default:
                       childTop = parentTop + lp.topMargin;
               }
               // 调用子 view 的 layout 方法
               child.layout(childLeft, childTop, childLeft + width, childTop + height);
           }
       }
   }
在 layoutChildren 中,遍历所有可见的子 View ,然后得到它们的宽高。
再根据不同的 gravity 来计算 childLeft 和 childTop ,最后调用 child.layout 来向子 View 传递下去。
子view根据四个顶点摆放在对应位置
performDraw
private void performDraw() {
    if (mAttachInfo.mDisplayState == Display.STATE_OFF && !mReportNextDraw) {
        return;
    }

    final boolean fullRedrawNeeded = mFullRedrawNeeded;
    mFullRedrawNeeded = false;

    mIsDrawing = true;
    Trace.traceBegin(Trace.TRACE_TAG_VIEW, "draw");
    try {
        // 调用 draw 方法,fullRedrawNeeded 为是否重新绘制全部视图
        draw(fullRedrawNeeded);
    } finally {
        mIsDrawing = false;
        Trace.traceEnd(Trace.TRACE_TAG_VIEW);
    }
    ...
}

private void draw(boolean fullRedrawNeeded) {

    ...

    // dirty 表示需要绘制的区域
    final Rect dirty = mDirty;
    if (mSurfaceHolder != null) {
        // The app owns the surface, we won't draw.
        dirty.setEmpty();
        if (animating && mScroller != null) {
            mScroller.abortAnimation();
        }
        return;
    }

    // 如果需要全部绘制,那么 dirty 就是整个屏幕了
    if (fullRedrawNeeded) {
        mAttachInfo.mIgnoreDirtyState = true;
        dirty.set(0, 0, (int) (mWidth * appScale + 0.5f), (int) (mHeight * appScale + 0.5f));
    }

    ...

    // 调用 drawSoftware ,把绘制区域 dirty 传入
    if (!drawSoftware(surface, mAttachInfo, xOffset, yOffset, scalingRequired, dirty)) {
        return;
    }

    ...

}

private boolean drawSoftware(Surface surface, AttachInfo attachInfo, int xoff, int yoff,
        boolean scalingRequired, Rect dirty) {

    // Draw with software renderer.
    final Canvas canvas;
    try {
        final int left = dirty.left;
        final int top = dirty.top;
        final int right = dirty.right;
        final int bottom = dirty.bottom;

        //锁定画布,由 dirty 区域决定
        canvas = mSurface.lockCanvas(dirty);

        // The dirty rectangle can be modified by Surface.lockCanvas()
        //noinspection ConstantConditions
        if (left != dirty.left || top != dirty.top || right != dirty.right
                || bottom != dirty.bottom) {
            attachInfo.mIgnoreDirtyState = true;
        }

        // TODO: Do this in native
        canvas.setDensity(mDensity);
    } catch (Surface.OutOfResourcesException e) {
        handleOutOfResourcesException(e);
        return false;
    } catch (IllegalArgumentException e) {
        Log.e(mTag, "Could not lock surface", e);
        // Don't assume this is due to out of memory, it could be
        // something else, and if it is something else then we could
        // kill stuff (or ourself) for no reason.
        mLayoutRequested = true;    // ask wm for a new surface next time.
        return false;
    }

    try {
        if (DEBUG_ORIENTATION || DEBUG_DRAW) {
            Log.v(mTag, "Surface " + surface + " drawing to bitmap w="
                    + canvas.getWidth() + ", h=" + canvas.getHeight());
            //canvas.drawARGB(255, 255, 0, 0);
        }

        // If this bitmap's format includes an alpha channel, we
        // need to clear it before drawing so that the child will
        // properly re-composite its drawing on a transparent
        // background. This automatically respects the clip/dirty region
        // or
        // If we are applying an offset, we need to clear the area
        // where the offset doesn't appear to avoid having garbage
        // left in the blank areas.
        if (!canvas.isOpaque() || yoff != 0 || xoff != 0) {
            canvas.drawColor(0, PorterDuff.Mode.CLEAR);
        }

        dirty.setEmpty();
        mIsAnimating = false;
        mView.mPrivateFlags |= View.PFLAG_DRAWN;

        if (DEBUG_DRAW) {
            Context cxt = mView.getContext();
            Log.i(mTag, "Drawing: package:" + cxt.getPackageName() +
                    ", metrics=" + cxt.getResources().getDisplayMetrics() +
                    ", compatibilityInfo=" + cxt.getResources().getCompatibilityInfo());
        }
        try {
            canvas.translate(-xoff, -yoff);
            if (mTranslator != null) {
                mTranslator.translateCanvas(canvas);
            }
            canvas.setScreenDensity(scalingRequired ? mNoncompatDensity : 0);
            attachInfo.mSetIgnoreDirtyState = false;

            // 调用 View 的 draw 方法
            mView.draw(canvas);

            drawAccessibilityFocusedDrawableIfNeeded(canvas);
        } finally {
            if (!attachInfo.mSetIgnoreDirtyState) {
                // Only clear the flag if it was not set during the mView.draw() call
                attachInfo.mIgnoreDirtyState = false;
            }
        }
    } finally {
        try {
            surface.unlockCanvasAndPost(canvas);
        } catch (IllegalArgumentException e) {
            Log.e(mTag, "Could not unlock surface", e);
            mLayoutRequested = true;    // ask wm for a new surface next time.
            //noinspection ReturnInsideFinallyBlock
            return false;
        }

        if (LOCAL_LOGV) {
            Log.v(mTag, "Surface " + surface + " unlockCanvasAndPost");
        }
    }
    return true;
}
最后调用了mView.draw(canvas);
public void draw(Canvas canvas) {
    final int privateFlags = mPrivateFlags;
    final boolean dirtyOpaque = (privateFlags & PFLAG_DIRTY_MASK) == PFLAG_DIRTY_OPAQUE &&
            (mAttachInfo == null || !mAttachInfo.mIgnoreDirtyState);
    mPrivateFlags = (privateFlags & ~PFLAG_DIRTY_MASK) | PFLAG_DRAWN;

    /*
     * Draw traversal performs several drawing steps which must be executed
     * in the appropriate order:
     *
     *      1. Draw the background
     *      2. If necessary, save the canvas' layers to prepare for fading
     *      3. Draw view's content
     *      4. Draw children
     *      5. If necessary, draw the fading edges and restore layers
     *      6. Draw decorations (scrollbars for instance)
     */

    // 第一步,画背景
    int saveCount;

    if (!dirtyOpaque) {
        drawBackground(canvas);
    }

    // skip step 2 & 5 if possible (common case)
    // 可能的话,跳过第二步和第五步
    final int viewFlags = mViewFlags;
    boolean horizontalEdges = (viewFlags & FADING_EDGE_HORIZONTAL) != 0;
    boolean verticalEdges = (viewFlags & FADING_EDGE_VERTICAL) != 0;
    if (!verticalEdges && !horizontalEdges) {
        // 第三步,画自己的内容
        if (!dirtyOpaque) onDraw(canvas);

        // 第四步,画自己子 view 的内容
        dispatchDraw(canvas);

        // Overlay is part of the content and draws beneath Foreground
        if (mOverlay != null && !mOverlay.isEmpty()) {
            mOverlay.getOverlayView().dispatchDraw(canvas);
        }

        // 第六步,绘制View的装饰,比如 scrollbar 等 (foreground, scrollbars)
        onDrawForeground(canvas);

        // 做完了,直接返回 we're done...
        return;
    }

    /*
     * Here we do the full fledged routine...
     * (this is an uncommon case where speed matters less,
     * this is why we repeat some of the tests that have been
     * done above)
     */

    boolean drawTop = false;
    boolean drawBottom = false;
    boolean drawLeft = false;
    boolean drawRight = false;

    float topFadeStrength = 0.0f;
    float bottomFadeStrength = 0.0f;
    float leftFadeStrength = 0.0f;
    float rightFadeStrength = 0.0f;

    // 第二步,保存 canvas 图层
    int paddingLeft = mPaddingLeft;

    final boolean offsetRequired = isPaddingOffsetRequired();
    if (offsetRequired) {
        paddingLeft += getLeftPaddingOffset();
    }

    int left = mScrollX + paddingLeft;
    int right = left + mRight - mLeft - mPaddingRight - paddingLeft;
    int top = mScrollY + getFadeTop(offsetRequired);
    int bottom = top + getFadeHeight(offsetRequired);

    if (offsetRequired) {
        right += getRightPaddingOffset();
        bottom += getBottomPaddingOffset();
    }

    final ScrollabilityCache scrollabilityCache = mScrollCache;
    final float fadeHeight = scrollabilityCache.fadingEdgeLength;
    int length = (int) fadeHeight;

    // clip the fade length if top and bottom fades overlap
    // overlapping fades produce odd-looking artifacts
    if (verticalEdges && (top + length > bottom - length)) {
        length = (bottom - top) / 2;
    }

    // also clip horizontal fades if necessary
    if (horizontalEdges && (left + length > right - length)) {
        length = (right - left) / 2;
    }

    if (verticalEdges) {
        topFadeStrength = Math.max(0.0f, Math.min(1.0f, getTopFadingEdgeStrength()));
        drawTop = topFadeStrength * fadeHeight > 1.0f;
        bottomFadeStrength = Math.max(0.0f, Math.min(1.0f, getBottomFadingEdgeStrength()));
        drawBottom = bottomFadeStrength * fadeHeight > 1.0f;
    }

    if (horizontalEdges) {
        leftFadeStrength = Math.max(0.0f, Math.min(1.0f, getLeftFadingEdgeStrength()));
        drawLeft = leftFadeStrength * fadeHeight > 1.0f;
        rightFadeStrength = Math.max(0.0f, Math.min(1.0f, getRightFadingEdgeStrength()));
        drawRight = rightFadeStrength * fadeHeight > 1.0f;
    }

    saveCount = canvas.getSaveCount();

    int solidColor = getSolidColor();
    if (solidColor == 0) {
        final int flags = Canvas.HAS_ALPHA_LAYER_SAVE_FLAG;

        if (drawTop) {
            canvas.saveLayer(left, top, right, top + length, null, flags);
        }

        if (drawBottom) {
            canvas.saveLayer(left, bottom - length, right, bottom, null, flags);
        }

        if (drawLeft) {
            canvas.saveLayer(left, top, left + length, bottom, null, flags);
        }

        if (drawRight) {
            canvas.saveLayer(right - length, top, right, bottom, null, flags);
        }
    } else {
        scrollabilityCache.setFadeColor(solidColor);
    }

    // Step 3, draw the content
    if (!dirtyOpaque) onDraw(canvas);

    // Step 4, draw the children
    dispatchDraw(canvas);

    // 第五步,绘制边缘效果和恢复图层
    final Paint p = scrollabilityCache.paint;
    final Matrix matrix = scrollabilityCache.matrix;
    final Shader fade = scrollabilityCache.shader;

    if (drawTop) {
        matrix.setScale(1, fadeHeight * topFadeStrength);
        matrix.postTranslate(left, top);
        fade.setLocalMatrix(matrix);
        p.setShader(fade);
        canvas.drawRect(left, top, right, top + length, p);
    }

    if (drawBottom) {
        matrix.setScale(1, fadeHeight * bottomFadeStrength);
        matrix.postRotate(180);
        matrix.postTranslate(left, bottom);
        fade.setLocalMatrix(matrix);
        p.setShader(fade);
        canvas.drawRect(left, bottom - length, right, bottom, p);
    }

    if (drawLeft) {
        matrix.setScale(1, fadeHeight * leftFadeStrength);
        matrix.postRotate(-90);
        matrix.postTranslate(left, top);
        fade.setLocalMatrix(matrix);
        p.setShader(fade);
        canvas.drawRect(left, top, left + length, bottom, p);
    }

    if (drawRight) {
        matrix.setScale(1, fadeHeight * rightFadeStrength);
        matrix.postRotate(90);
        matrix.postTranslate(right, top);
        fade.setLocalMatrix(matrix);
        p.setShader(fade);
        canvas.drawRect(right - length, top, right, bottom, p);
    }

    canvas.restoreToCount(saveCount);

    // Overlay is part of the content and draws beneath Foreground
    if (mOverlay != null && !mOverlay.isEmpty()) {
        mOverlay.getOverlayView().dispatchDraw(canvas);
    }

    // Step 6, draw decorations (foreground, scrollbars)
    onDrawForeground(canvas);
}
draw 过程大概有下面几步:
1.绘制背景:background.draw(canvas) ;
2.保存当前的图层信息(一般来说跳过);
3.绘制自己:onDraw(canvas) ;
4.绘制children:dispatchDraw(canvas) ;
在 dispatchDraw(Canvas canvas) 中,遍历子 View ,然后调用 child.drawChild(Canvas canvas, View child, long drawingTime) 方法来执行子 View 的绘制流程,从而实现了绘制过程的向下传递。
在 draw(Canvas canvas, ViewGroup parent, long drawingTime) 中, 若没有缓存的话,那么调用 draw(canvas) ; 否则直接调用 dispatchDraw(canvas) 分发给子 View 适用于 ViewGroup
5.绘制边缘效果,恢复图层(一般来说跳过);
6.绘制前景装饰:onDrawForeground(canvas) 。
小结
我们把整个过程梳理以下
WindowManagerGlobal.addView()中代码root = new ViewRootImpl(view.getContext(), display)创建了ViewRootImp WindowManagerGlobal.addView()中又调用了ViewRootImp的setView(view, wparams, panelParentView) 与decorview关联
-并在其中调用了requestLayout();
—-其中调用了 scheduleTraversals();
——其中在主线执行doTraversal();
———其中执行performTraversals();
———–其中执行了measureHierarchy根据view的大小调整window大小
———————————接着调用了performMeasure(childWidthMeasureSpec, childHeightMeasureSpec);
—————其中执行了DecorView.measure
——————-其中执行了DecorView.onMeasure
———————–其中循环执行了measureChildWithMargins(child, widthMeasureSpec, 0, heightMeasureSpec, 0);
———————– 1.ViewGroup.measure->ViewGroup.onMeasure -> ViewGroup.measureChildWithMargins
———————– 2.View.measure -> View.onMeasure
———————————接着调用了performLayout(lp, desiredWindowWidth, desiredWindowHeight);
—————其中执行了DecorView.layout 而viewgroup没有layout 进入view的layout
——————-其中执行了DecorView.onLayout 即FrameLayout.onLayout
———————–其中循环执行了child.layout(childLeft, childTop, childLeft + width, childTop + height);根据四个点摆放位置
———————————接着调用了performDraw();
———–接着调用了ViewRootImp的draw(fullRedrawNeeded);
———–接着调用了ViewRootImp的drawSoftware
—————其中执行了DecorView.draw 而viewgroup没有draw 进入view的draw
——————-其中执行了DecorView.onDraw 即FrameLayout.onDraw 但是viewgroup没有这个方法 需要分发给子view执行
——————-接着执行了ViewGroup的dispatchDraw 循环执行drawChild(canvas, transientChild, drawingTime);
——————-其实就是viewgroup下子view执行draw 再执行onDraw()
注:DecorView 其实就是 FrameLayout
End.